Thursday, 10 April 2014

Completion of the project

Today I finished off the last of my work for this module. The main things I accomplished today were light mapping my digger, creating a new scene with different lighting and then rendering the scene whilst organising the last of my files for my CD hand in. 

The light map for the digger caused me a lot of trouble. I originally tried to automatic map my digger and simply give each piece some padding. Whilst in theory it's not a bad idea, it went horribly. There were a lot of artefacts and the whole thing had black seams everywhere. I was shown today a quick and usually effective method of light mapping it by using the layout option in Maya's texture editor. This shrank them down but kept them in resolution to each other, giving them equal space and padding all over. This worked really well and saved me a lot of hassle. 

The broken lightmap


The working lightmap


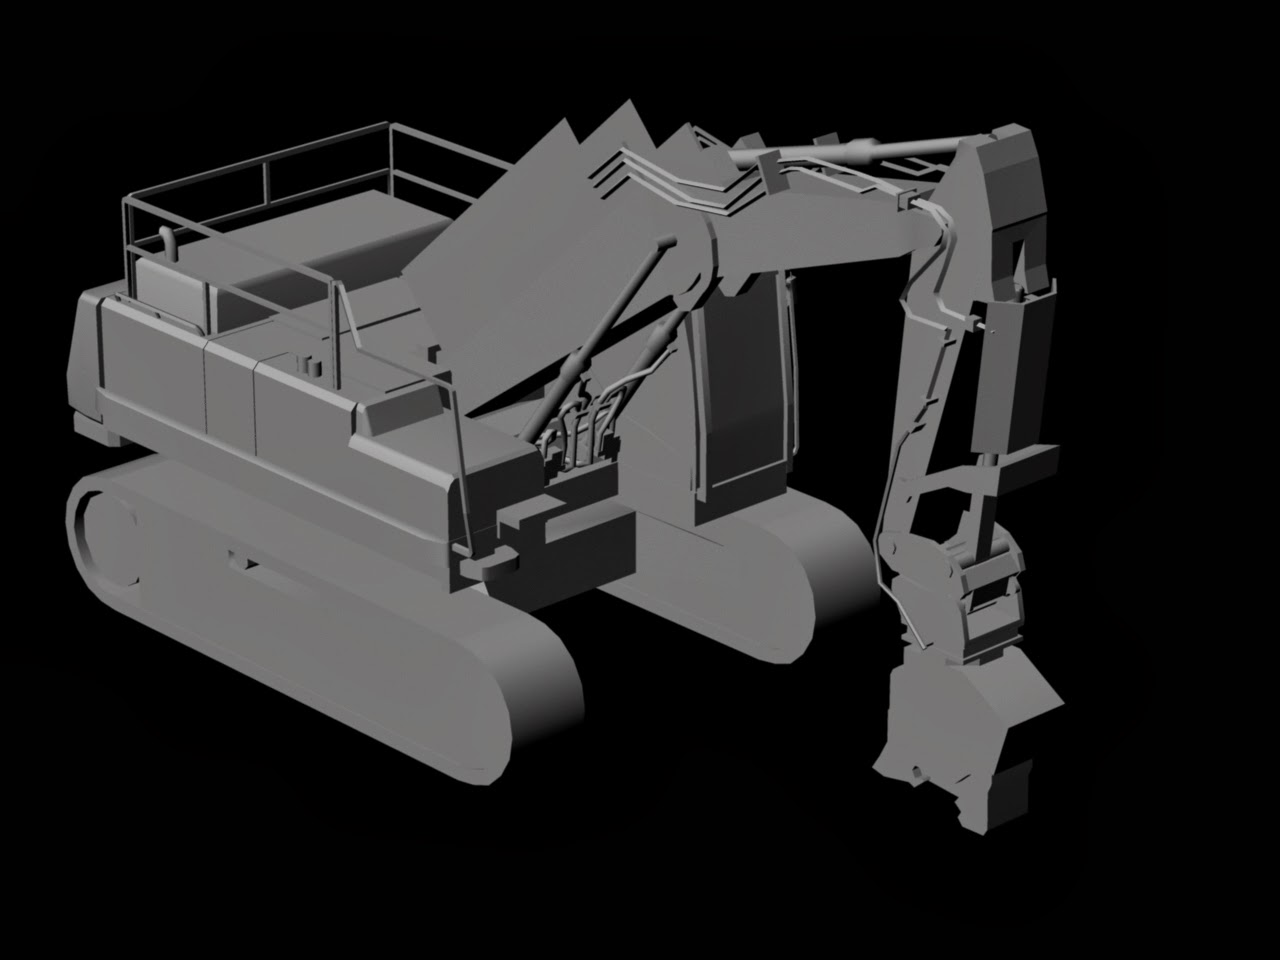
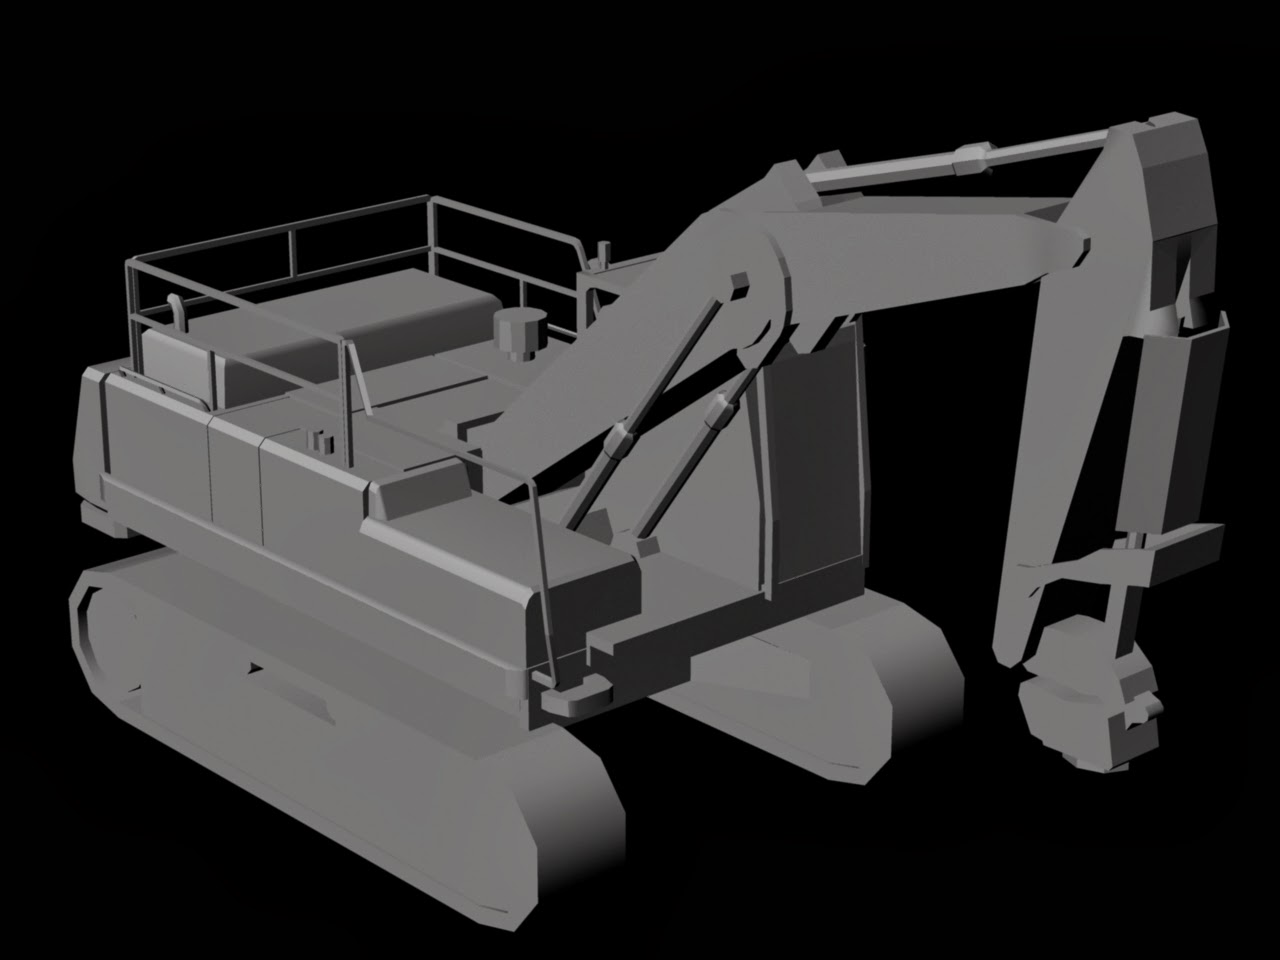
I then made my last scene. It was pretty similar to my previous attempt but with different lighting and slightly different angles. As for the final renders I'm really happy with how they came out. If I had to redo the assignment I would change a few things. I would spend less time modelling and UV'ing and get the texture work going a lot earlier. I would also research more about light maps, since it's not been a strong point here. But overall, I'm very happy with my performance and look forward to future 3D work. 

Final Render #1


Final Render #2


Gantt chart

This is a GANTT chart showing my progression through this module compared to what I expected it to be (which was guided primarily by certain deadlines we had to meet). All in all, I feel I did quite well with it. The texturing of the digger took me quite a while (including UV mapping) because I lost some of my drive when I started creating the UV map for the digger which let me down. I don't feel that I fell behind on anything else, I even feel that I did better than expected too when it came to timing, especially in modelling areas of the project.


Monday, 7 April 2014

Importing into UDK and light maps

The last week has been spent preparing my diorama for rendering in UDK. The first thing I did was import all my models as FBX files into my own saved package. After this I moved on to importing all my texture images. These were then slotted together into a single material for each model (barring the digger which had two, one for the vehicle itself and then the decal map). I didn't have any trouble putting them together apart from for the digger itself. I struggled to get my alpha map working correctly at first. Eventually I found that I had missed an import check box on the import screen along with having to change the blend mode of the material itself. With these done I then applied them through the static mesh editor so that they were applied to all instances of the model that I would create. 

After all this I decided to start light maps. I quickly found that they certainly aren't a strength of mine. The reason for creating one is so that models light correctly and display nice shadows. The process of making a light map doesn't actually involve making a map itself, more just creating a new UV set for each model in Maya with very specific rules. You cannot overlay UV's, have red UV's, they must have 2 pixels of padding (at least) to not have strange issues, cannot be connected if on a corner of 90 degrees or more and should be placed on the pixel lines of the grid as much as possible. All of this together makes for a lot of stress, especially when you don't know what you have done wrong on it so far. I have made light maps for all of my diorama now, I just need to make the diggers set. However the problem is that I don't know how I will fit it all on one map as much of my UV's are overlayed or connect around 90 degree corners. All in all I don't have a clue of how to do it but am getting assistance this Wednesday so hopefully I will be able to make one before the deadline else I will lose marks.

As for the scene itself, I like the layout I have yet I think that I will change the lighting quite a bit, it's just like this to check the shadows and things. 

UDK scene


Standard UV's in channel 0


UV's for the light map in channel 1


 My Material set-up in UDK


My content browser


Saturday, 29 March 2014

Diorama render and updates

So this is my render of my textured diorama (note, not the final one). I'm happy with how it turned out, I'm hopeful that it will look really nice in UDK. Since my last post I added a construction sign and made the fences dips be shown through the use of a normal map and AO instead of geometry as it didn't really need to be made 3D and it took up unnecessary tris. As for the making of the textures themselves, the sign was very easy since there was a construction site with some on the way to university from my flat conveniently. Using photos it was made quickly. The claw was okay but I'm not that happy with it, I think it could use with some more time on it which I may do tomorrow. The fence is fine and I'm happy with how the floor texture came out as my photos of dirt weren't perfect and I thought I would have to do it tomorrow with some new photos but my current ones were enough apparently. I also had a major issue with my hard drive requiring me to remake my decal map and sort out some errors on my digger textures which was very annoying and mostly my fault sadly. But nevertheless, I will be moving this into UDK in the coming weeks and getting some beauty renders of it which will be posted here then.


Wednesday, 26 March 2014

Diorama model

This is the model of my diorama. I may make changes to it but for now this is it.


Friday, 21 March 2014

Diorama design

Just a quick mock up of what I plan to make for my diorama. It's very simple and features several objects present in the environment that I photographed my digger in. It will be easy to model and not too difficult to texture either so I can't see a problem with me creating this. 


Thursday, 20 March 2014

Digger textures

I just finished my texture maps for my digger. Here are all the maps.

Decal Map


Decal Specular Map


Diffuse Map


Normal Map


Specular Map


Render #1


Render #2


I'm not all that happy with the final result as I would have liked another few weeks to work on it but considering the time frame I'm pretty happy with it.


Decal map

I finished my decal last night. I'm pretty happy with how it came out because it was on a  512 x 512 map so it has really good resolution. I made them using my own pictures which I then cleaned up with the brush and eraser tools and used the alpha channel to get rid of the background. 


Wednesday, 19 March 2014

Finished Normal map

Today I finished my normal map for the digger. For the most part it proved simple with only a few errors. Whilst the map looks very empty, this is because I have only been doing a few select areas that I feel need the extra attention and detail. My normals were done in two ways, baking detail to a plane and then having the low and high poly model overlayed. I used the plane method for the majority as I felt more confident with it but the back section was done with a high poly model over the low poly model. Whilst basic, I'm happy with the work.  


Monday, 17 March 2014

Finished AO

I just finished my ambient occlusion map which will be used to add shadow detail to my diffuse map. It proved very awkward to create. I created it by splitting the model into 4 parts and AO'ing them. I had some issues with this too. I had to get rid of any overlayed UV's until there was only one set left there. I also ended up with many small artifacts which I had to remove. I also ended up hand painting a fair bit of it as I felt some of it should have more/less pronounced shadow. Overall I think it will be helpful to my diffuse. I also have it setup so that I can edit it further once I start adding more details to the texture (in case it doesn't look right). Next I plan to either create the diffuse map or the normal map. 


Texture block colours

This is my digger with it's block colour's applied. Of course it needs a lot of work but it's moving forward and this well help me identify where the areas are and how I should texture them. Next I plan to get an AO map and then move onward to my diffuse map. 


Friday, 14 March 2014

Finished UV's 2

I slightly updated my UV's today. The reason for the updates are that I had a few red UV's appear this morning for some reason and so I rejigged a few parts of it to make it better. I managed to get slightly better resolution on the wires that are at eye level which is good.


Saturday, 8 March 2014

Finished UV's

I have finished re sizing and organizing my UV sheet. Overall, I think I kept a lot of resolution in all the biggest most noticeable areas which is all I can really do. I have 3 overlapped UV's which are red because they were special cases. Two are windows which will be tinted, so they shouldn't need any shadow on them. The other is so out of sight I'm not sure if it would even need to be modeled but it is better to be safe than sorry. It would also have taken up a sizable chunk of my working area. Anyways, my UV sheet.


UV update

Recently I've been working on my UV's. Despite having done most of them previously, I got rid of them as a lot of them weren't usable and it was so disorganized that I felt more comfortable just simply redoing it whilst keeping it neat as I went. I have unwrapped all the parts of my model but I now have to fit it all into the texture space which is going to be very difficult. A lot of the pieces I will lower the size of quite dramatically as they won't have any detail on. I have overlapped a lot of UV's and there are more which I may do this with but I don't really want to have any red UV's unsurprisingly. 


Saturday, 1 March 2014

Post marking changes

I had my low poly model marked this week. I was pretty happy with the score though I made some silly mistakes which I feel I should have noticed but that will come with experience I'm sure. My first mistake which I changed was Ngons on my diggers base. This was a mistake I made on the day when I added a single bevel segment to it and didn't fix it which was annoying. I changed the shape of a few parts on the arms to be more accurate to my reference but didn't actually make any big changes there. The last thing I changed was how I am doing my tracks. My lecturer mentioned about how they would use an animated texture on some parts of the tracks and this prompted me to look closer at the actual tracks and I found a few issues which needed fixing. I made the tracks themselves thinner and made the chain (that would have an animated texture) on the inside of it using a plane. I added an edge loop at the top middle of the track to get the shape closer to the reference. And then finally the cylinder in the end had gaps around it before which I have fixed using 2 planes. 


Saturday, 22 February 2014

Finished low poly model

 So this is my final low poly model which I have to hand in next Friday. I was told that the planes I had put on the arm for wires wouldn't work and so I've now modeled more wires onto it and will have to texture some straight onto the arm. Whilst the idea of relying so much on textures worries me, I feel that I have done all I could with the amount of polygons I was given to create this vehicle. I have started UVing my model and will post updates as I go.


Tuesday, 18 February 2014

Digger UVing

So I've started UV mapping my digger to save me work later since I have some spare time until I can have the model marked and checked. I did this through a new method which I haven't used before which is planar mapping using the best plane option and then changing the projection height and width to 400. The important part of the method is the last bit, changing the projection height and width to the same number for everything makes all the UV's be in the same scale so no issues trying to size everything up later! As you can see below I haven't tried organizing it all onto the UV space as I wish to unwrap it all first and then at the end I will make certain parts smaller if they can't be seen easily etc. You can also see where I have unwrapped so far on the digger picture, I have done a lot of the main body already, I plan to try and finish off the rest of the arm tonight except the wires which I still need checked by my lecturer. 


Sunday, 16 February 2014

Digger, low poly model finished (hopefully)

So here is my low poly digger. There are a few areas which I'm unhappy with, mainly the planes that I plan to use instead of actual modeled wires on the bottom of the crane arm. I'm going to get advice from my lecturer but I think I am done for the moment.


Saturday, 15 February 2014

Digger - Nearly complete low poly

I haven't updated this in a while so here's an update on my digger model. The model is mostly complete now with a lot of detail being given to the front claw area and the wiring under the arm of the digger. I went through the model recently optimizing all the parts, getting rid of faces which won't be seen and merging unnecessary vertices. I have now used 5057 triangles on the model now giving me 943 left to update it. There is little to do for my low poly model now, I plan to add wiring to the top area of the arm, using 3 sided cylinders since it won't be seen up close by any players, but before that I want to give the model a once over and make sure all of it is the right shape and size as my lecturer noticed a few parts which weren't like how they are in my pictures. Then I will give it the once over and UV the model before starting to make high poly bakes of certain parts of the model that need it most. 


The wiring and claw details that I added.


The wires I plan to add next.


Friday, 7 February 2014

Finished block out

So this is my finished block out which is 4176 triangles. In the end I added to much detail for it to be a block out but that's what I'll call it. I'm pretty happy with it and once I have been given feedback by my lecturer then I will start working on other things. What I think I will do is add some wires and a little bit of detail under the arm of the digger. 


Wednesday, 5 February 2014

Nearly Finished Blockout

So this is my block out in its nearly finished state. Honestly I'm really happy with it for the most part, much of it won't even need changing when it comes to the extra detailing after this. I still have over 2000 triangles to use in the model. Some areas will need improving but the arm is my favorite part, I do not think it needs much in the way of changes. I still need to create the claw but that is all for the block out. 


JCB Progress Shots

So this is another pair of progress shots of my JCB vehicle. As you can see, I have now blocked out everything but the arm of the vehicle which I will do today. I think I have spent my polygons wisely yet in some areas I have added enough detail that they won't need to be changed when I'm adding detail. My polycount so far is at 2202 Tri's whilst my limit is 6000. I think I'm doing quite well with it so far, the only part I am really worried about polygon wise is the tube's situated along and at the base of the arm, these will be challenging to get withing the limit. Anyway, progress is being made.


Tuesday, 4 February 2014

Start of modelling

So I have finally actually started modelling. As you can see in my scene, I have side and front pictures in so far (the photo has my unskewed drawing behind it, I switch between them to get a clearer look at things). I have blocked out my tracks and made the base of the cab. I'm trying to keep everything very poly efficient at this point as I don't know how many I'll use overall. I can always go back and redo areas of it and add more detail. Anyway, I'll continue modelling now, just a progress shot really. 


Front view without arm

So today I finished the front view off of my vehicle. As you can obviously see, it doesn't have it's arm in the picture. My reason for this is that it would block much of the model and I plan to draw the arm separately so that I can use it when I need to but can see the rest whenever I like too. Also below you can see my updated side view which has a few small details added but is much the same. I am finding this very difficult to un-skew all my images due to the size of the vehicle, honestly I'm surprised at the mark I got for my photos. Anyway, I will draw the arm out now and then finally start modelling. 


Monday, 3 February 2014

Updated block out

After trying to use the image from my previous post to help me block out my model I ran into several problems. The main problem was the perspective in the image. It wasn't directly from the side as it needed to be. The main areas that were problems were the tracks and JCB's arm as they were the lowest and highest parts on the vehicle respectively meaning that they showed some of the depth in the object, not a flat image as is needed. So to combat this problem I decided to draw out my own image from the side. I could keep many things the same such as the majority of the cab and upper arm but some areas needed more help such as the details on the back of the cab. This involved going through many images and piecing together where things happened, e.g. where the pipes begin and end, how exactly they form etc. This has most of the detail that I will need to model on it which is good. I plan to do one from the front and then possibly the other side too. I won't do one from the back as it is really simple, all the details can be seen from between the side and front views.